Friday, December 28, 2012

Oreo Truffles

I have survived Christmas and emerged unscathed, though maybe a couple pounds heavier (sad face), and I must say, these Oreo Truffles are part of the reason why. They were super easy to make, only about 20-30 minutes total, and that includes the ten minutes you have to chill them.


Oreo Truffles
1 package Oreos
1 package cream cheese, softened
16oz white chocolate chips (I used about a bag and a half)

  1. Take all but three of the Oreos and crush them, filling and all. You can either use a food processor, or the good old-fashioned ziploc bag and rolling pin technique. You're going for a fairly fine, uniform texture.
  2. In a medium-sized mixing bowl, combine the crushed Oreos and the cream cheese, blending well. It's going to wind up looking something like cookie tar.
  3. Using your hands, roll the Oreo mix into small balls, about an inch or so in size. Place them on a cookie sheet, and then put the whole mess in the freezer for about ten minutes to firm up.
  4. Meanwhile, take the remaining three Oreos and scrape out the majority of the cream (a little bit left is OK, but you want to get almost all of it out). Crush the cookies into a fine powder with the back of a fork (or in a ziploc bag or food processor again) and set aside.
  5. Melt the white chocolate chips according to the instructions on the bag.
  6. Remove the balls from the freezer, and one at a time, drop them into the melted with chocolate, covering the whole ball, and remove with a spoon. Allow excess chocolate to drip off, and then put the truffle back on the cookie sheet. While the chocolate is still soft, sprinkle a pinch of the Oreo powder on the top of each truffle. The chocolate will harden up at room temperature, so you'll want to dust them as you go. Don't try to wait until the end, or else you'll have to drizzle extra chocolate on top.
  7. Give them just a couple minutes to set, and then you can put them into a storage container or on a plate for serving. Enjoy!


These are great to take to a party, and they go quickly. You can also make them with milk or dark chocolate, or peppermint bark, but I prefer the white chocolate because it gives it that cookies n' cream flavor. I think they'd be fun to make with your kid as well, though Mikayla is a little young.

Let me know what you think!

<3,
Erika

Saturday, December 22, 2012

To Whom It May Concern:

I have been going crazy crafting for the last few days, but I can't post anything until after Christmas! Bear with me for a few more days. :)

I will have some delicious goodies to post tomorrow: I'm making Oreo truffles, Red Velvet Brownies with White Chocolate Icing, and some traditional peanut butter and chocolate chip cookies. Yum!

<3,
Erika

Wednesday, December 19, 2012

DIY Canisters and Storage

Now, I don't recollect if I've mentioned how small my kitchen is, but.... yeah. Not a whole lot going on in terms of storage space. I also have been lusting after some canisters lately, because I've been doing it straight out of the bag with my flour and sugar and whatnot, and that just feels so ghetto. It makes it much harder for me to do my whole "fake cooking show" routine for the babies. I thought long and hard about the answer to all my problems, and this is what I've come up with:


Supplies Needed:
  • Empty jars - mine were spaghetti sauce and pickle jars.
  • Empty baby wipe boxes
  • Spray paint in 1 or 2 colors, up to you
  • Sharpie Paint Pen - The guy at Michael's said it'd last through the dishwasher, but I haven't tested it yet)
  • 3 3/4" screws per box
I first spray painted the inside of the boxes and the lids black, and allowed them to dry. Then I flipped the boxes over, and did the outsides in silver. My paint lines along the lip didn't come out totally smooth, so if you're a perfectionist I'd recommend using tape. While waiting for everything to finish drying, I labelled all of the jars. You could always get graphite paper to do your lettering if you'd like to use a specific font or something, but I'm cheap, and my handwriting looks fine to me. Michael hung the boxes, using three 3/4" screws along the top of each box, about half an inch down. He also left enough room in the middle for me to add more boxes and jars in the future.

I plan to go back later and write something on the boxes with the paint pens (I have black and white), but I haven't decided what yet. Let me know if you have any suggestions!  

<3,
Erika

Monday, December 17, 2012

Homemade Trail Mix

This is such an easy snack to prepare for Mikayla, and it's one I fall back on pretty regularly. She really likes it too. There are infinite different combinations you can put in your mix, and chances are you have plenty of ingredients on hand to make your own.


The one I made today has Cheerios, Life cereal, pretzel sticks, gummy fruit snacks, both regular and golden raisins, dried cranberries, and a few white and semi-sweet chocolate chips. I usually make enough for a few servings, and just store it in a sandwich bag or tupperware. 

Suggestions for Different Ingredients
  • Cheerios, Life, Corn Flakes, or really any cereal you prefer
  • Pretzels
  • Chocolate chips
  • Raisins, cranberries, dates, or other dried fruits
  • Shredded coconut
  • Gummy fruit snacks
  • Nuts 
  • Granola
  • M&M's, Reese's Pieces, or other small candies
  • Seeds like sunflower or pumpkin
  • Mini marshmallows
  • Goldfish
  • Mini Nutter Butters or Oreos (the kind in the snack packs)
  • Wasabi peas (spicy, not recommended for little ones)
  • Dried banana or apple chips
  • Sesame cracker sticks
  • Baked chickpeas
Leave me a comment if you think of any other ingredients!

<3,
Erika

Saturday, December 15, 2012

Pumpkin Chocolate Chip Cookies

I have a confession to make.

My name is Erika, and I have an unhealthy addiction to Pinterest. It doesn't help that my biggest board is currently the one for cookies, cakes, and other delicious goodies. Ooh, I'm gonna get so fat. Further contributing to my fattening is the fact that the only sweets Michael will eat are from Little Debbies, not homemade. Lately I've been pinning a lot of pumpkin recipes, and this recipe for Pumpkin Chocolate Chip Cookies looked like it was right up my alley. Plus, I actually had all the ingredients for it.


Ingredients


  • 1 cup canned pumpkin
  • 1 egg
  • 1/2 cup vegetable oil
  • 1 cup white sugar
  • 2 cups flour
  • 2 tsp baking powder
  • 1 1/2 tsp cinnamon
  • 1/2 tsp salt
  • 1 tsp baking soda
  • 1 tsp milk
  • 1 TB vanilla
  • 1 11oz bag chocolate chips

  1. Combine pumpkin, sugar, vegetable oil, and egg in a large bowl. In a separate bowl, stir together flour, baking powder, ground cinnamon, and salt. Dissolve the baking soda with the milk and stir into the wet ingredients. Add flour mixture to pumpkin mixture and mix well. Stir for about one minute.
  2. Add vanilla and chocolate chips and stir until combined.
  3. Line baking sheet with parchment paper. Drop cookies on by the spoonful. Bake at 350 for 10-12 minutes.


The cookies came out delicious, with a soft, cakelike texture - definitely not your standard chewy cookie. One thing of note - the recipe called for an 11oz bag of chocolate chips, and the bag I had (I think it was Nestle Semi Sweet) was a 12oz bag. I love chocolate, so I went ahead and used the whole bag, but in retrospect, I would have used less chocolate or more pumpkin. They were still really good, but I felt like the chocolate kind of overpowered the pumpkin flavor. Mikayla refuses to try the cookies, but Michael did try one and he said they were OK (and from someone who doesn't eat my baking, that is a compliment). One of the guys from next door tried one, and he seemed to enjoy it, but he doesn't know much English so I'm not really sure.

As you can see from the above picture, I find that the best technique (for me, at least) for baking in my OBK is to take all the ingredients out, and then put them up as I use them. I also only have one set of dry measuring cups, one wet, and two sets of measuring spoons (but only because someone broke my tablespoon, and that was a problem). I just rinse them off with hot water if I need to reuse them for another ingredient. By doing it this way, I save myself a lot of spinning in circles finding everything, and there is also minimal mess to clean up once the cookies are in the oven.

What is your strategy for baking? Do you pull out everything at once, or one thing at a time?

<3,
Erika

Friday, December 14, 2012

DIY Menu Board

When we first moved into our apartment, I was totally new to the concept of worrying about what other people eat every day. I mean, come on, if you can walk, you can walk to the kitchen and fix yourself a snack, am I right? Well, apparently not. So then we started doing this thing where we'd go to the grocery store, pick out a couple pounds of ground beef and chicken, and the rest would be things like bananas and frozen burritos until we ran out of money. This is great for snacktime, but when you try to make an actual meal, you realize all you have is beef, ramen noodles, yogurt, mandarin oranges, and ketchup. While that may be a balanced meal in terms of food groups, it's not exactly tasty. This is where menu planning comes in.

Now, if you're nothing like me, you love getting your children ready, packing the monstrosity of a diaper bag needed for two in diapers, strapping the unhappy infant into her carseat, struggling down the stairs of your apartment carrying aforementioned diaper bag and children, shoving everything into your teeny tiny Toyota, driving to the grocery store, and doing it all again (only backwards). And then you get to do it again when you get home, only with groceries! Awesome! Yeah, not exactly my idea of a fun time, but that's what happens when you make tacos for dinner and realize you don't have something crucial, like taco shells. Or cheese. (Cheese is mandatory.)

So a little poking around on Pinterest (did I mention I freaking love Pinterest?), and I'd found a few different examples of menu boards. There are many that are as simple as a chalk or dry erase board with the days of the week, and while this may work for some people, I felt that we needed something a little more organized. Michael is one of those guys that you ask him what he wants for dinner, and he says, "Oh, I don't know, whatever's easiest." He needs more direction. I also wanted my menu board to help my grocery list making process a little easier, and prevent those "quick" runs to the grocery store that take half an hour, despite the fact that Kroger is less than a mile away.

Finally, I found a link to The ULTIMATE Menu Board (her name, not mine) on Pinterest, and I fell in love. For one, it's super-cute, and uses a weekly (instead of monthly) menu. I also knew that I would have to spend very little moolah making my own. I like the use of cards, because it allows you to sort through and make little piles until you finally settle on seven meals (Michael seems to enjoy it). All the ingredients needed are listed on the back, to make your grocery shopping much less painful. And so, my menu board was born!


To make your own, you'll need:
A picture frame, about 11"x14" (I found mine at Value Village for $1.)
8 Clothespins 
Index cards
Scrapbook paper
Craft paint
Hot glue gun
A small box or two (Mine is from a box of spaghetti.)

I found that I had everything I needed at home except the frame and the index cards, so I spent a little over $2 out-of-pocket on this project. My frame was purchased at Value Village (kind of like a Goodwill or Salvation Army), and it was a very attractive (not) print of hummingbirds on a wooden backing. No glass or anything, which is fine because it isn't really necessary. I glued scrapbook paper over the back, with a little red stripe to hide the line where I had to use a new sheet. I painted the frame and the clothespins with craft paint, and hot-glued everything together. I also added an extra clothespin on the bottom to hold printed recipes that I plan on using, and only one box because I'm lazy and that's all we really need for now.
The index cards were cut in half, and were not laminated because again, I am lazy. The front just has the entree, and the back has all ingredients needed, including seasonings and oil for cooking. You might notice that the cards are written in different colors. I did this so that I can quickly glance at the board and know what kinds of meat I need to make sure we have, and to ensure some variety in our diets. 
Red - Beef, veal, and lamb
Blue - Seafood
Orange - Chicken and other poultry
Green - Pork, bacon, and sausage
Purple - Can be made with different meats, or a combo. Also, "eat out," and "leftovers."

This system makes it very easy to add in new menu items whenever you would like (which is a lot, thank you Pinterest). Michael sprayed the finished product with a thin coat of lacquer to give the frame a little shine.

Let me know what you think!

<3,
Erika


Thursday, December 13, 2012

Adventures in Salt Dough

Please don't feed this to your children; they make horrible faces and spit all over the floor.

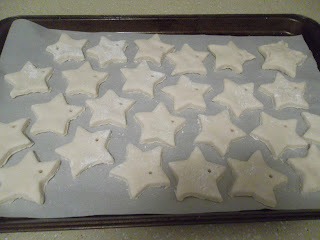
Aside from that, though, it's great fun! I thought it would be nice for Mikayla to make her own Christmas ornaments for family members this year, so that she'd have her own little gifts to distribute. I started out ambitious - I got out probably eight different cookie cutters and made sure to put wax paper down to protect the table. The wax paper came back up maybe three or four minutes later (thank you, Mikayla), and we only used the star. It ended up pretty messy, so I wouldn't recommend doing it if you need your child to stay clean for some reason.


Basic Salt Dough

 
2 cups salt (I did 1c kosher salt and 1c table salt)
2 cups all-purpose flour, plus extra
1 cup water

This recipe yielded about 25 2-inch stars, plus a good-sized ball leftover for another project we have planned. We stored the extra dough in a tupperware in the fridge. Just cut the recipe in half if you don't want a ton of salt dough. Kosher salt gives it a grittier texture, but feel free to use just table salt if that's all you have.

Mix together the salt and flour, then add the water a little at a time. Stir with a wooden spoon until a dough forms, then knead until you reach your desired texture. The humidity affects the consistency your dough will have. If it seems a little sticky, don't hesitate to add a little more flour. (It was raining here, so I used probably more like 3 cups). Flour the table before you roll your dough out and cut it, too, or else it'll stick to the cookie cutter and end up deformed. Place your shapes on a cookie sheet with some parchment paper to prevent sticking, and don't forget to make holes if you plan to hang them! The smaller end of a chopstick works well. Bake at 200° for at least two hours, longer if your shapes are on the thicker side. After they cool, you can paint them.

Mikayla had a blast playing with the sticky dough. The best part was when she said, "Look! A hat!" It's definitely a teachable experiment for your little ones - measuring, counting (especially if you use a 1/4 or 1/2 cup scoop), pouring, and mixing. If they're on the younger side, you'll probably have to cut the shapes yourself, but they'll have plenty of fun playing with the other cookie cutters and dough.

I don't recommend using Crayola Washable Paint to paint the ornaments. It crackled on some; we might've been able to prevent it by using a little more paint or a second coat. Let me know if you are more successful with Crayola or another brand of paint.

<3,
Erika


What is a One Butt Kitchen?

Right now you might be asking yourself, "What is a One Butt Kitchen? Do I have it? Is it contagious, and is there a cure?" Excellent questions, really. A One Butt Kitchen is exactly what it sounds like - stand in the center and you can reach just about everything. This is a One Butt Kitchen:


As you can see, the fridge and oven cannot be open at the same time. Neither can the oven and the dishwasher. And if you're 5'1", like your humble narrator here, you can't reach the cabinets and unload the dishwasher at the same time. Joy. Other than that, though, it works great for a short person.

OBK is spread through the construction of poorly designed apartments, modular homes, and yes, even houses. Millions of men and women suffer silently every year, and you may be one of them. If you have OBK, you probably already know, though you may be in denial. The only cure for OBK is money - enough to move, that is. In many cases it can be managed, with the use of techniques designed to minimize the chaos and clutter, while still allowing you to enjoy home-cooked meals. 

I'd known about OBK since I was a child, when my Granny had a hallway/kitchen/laundry area in their double-wide trailer. I never thought much of it, since that was all I'd known, but when I went to my friends' houses, something just didn't seem quite right. Allowed in the kitchen while someone was cooking? Preposterous. You couldn't just walk in and rummage though the fridge. You'd be in the way. And these commercials! Something about the kitchen being the gathering point for your home, I don't quite remember. I might have actually laughed out loud at that one. One day Granny sat me down, and explained that she had OBK, and that there was nothing wrong with it, but go ahead and go in the living room because she had to make dinner and fold the whites.

I myself contracted OBK in the summer of 2011, when my husband, Michael, and I moved with our 1-year old, Mikayla, into an apartment. In most regards, it was an upgrade for our little family. We went from sharing one bedroom at my mother-in-law's house, to a two bedroom apartment, with our very own living room, bathroom, and tiny little eat-in kitchen. When we became carriers of OBK, we also passed it on to Mikayla, and when Amelia was born in the fall of 2012, she was born with OBK. I have made a vow to myself to one day overcome this annoying condition, and that is why I also strive to spend less on the food we eat, so that we can buy a house some day.

Until then, I will be here, sharing with you from our daily battle with OBK, providing recipes, different DIY projects that have made my life easier, and techniques to help you as well. If you think you may have OBK, please feel free to leave any questions or controversy in the comments. Thanks!

<3,
Erika